

Carnitas Tacos
Years ago, a friend walked into my office at lunchtime and promised to take me to the world’s best carnitas. “The best? Really?” (Now who could argue with that offer?)
So, off we went, to a tired neighborhood and a sad strip of store-fronts. You couldn’t help but notice the peeling paint and tattered signs, covered with dust from the hot dry summer. Never one to be dissuaded by packaging when it comes to food, I hopped out and made my way indoors.
The scent of smoke, roasting meats and chilis immediately enveloped me like a soft tortilla. A man slid a paper plate with carnitas across the counter as he chatted with my colleague in Spanish. Just a few bites and I knew the carnitas were as good as my friend claimed and I had hoped. Moist, tender chunks and shreds of pork fell apart in my mouth – with the occasional crunch of caramelized flavor. It is not surprising that this “Mexican” food memory stayed with me for decades – even though I was well north of the border near San Francisco.
Since then, I’ve had carnitas more times than I care to admit – with many return trips to the California store-front and a number of visits to Mexico. And perhaps the best I had in Mexico (in Oaxaca) were just as good, but I’m not convinced they were better. So, the store-front version is what I’ve strived for ever since – experimenting with different methods and always working toward that magical recipe. Years and many plates of carnitas later, I’m happy to report that the keys to success are a traditional two-step cooking method (slow moist heat followed by browning) and a trio of dried chilis.

Oaxaca, Mexico
- COOKING FUNDAMENTALS: MOIST-HEAT COOKING -WITH AND WITHOUT BROWNING
A slow moist-heat cooking method uses low temperatures and simmers (immersed) or braises (partial liquid) food. This means there is no browning, and, therefore, there is less flavor and color (Method #1 below). To fix this problem, you can use a two-step process, brown first and then use slow, moist-heat (Method #2 below). This works great for beef stew, where the meat is browned first at a high temperature and then slow-cooked with moisture for tenderness. Unfortunately, this method doesn’t work for carnitas where you not only want flavor and color from browning but a mix of textures in the final product. To address this problem, simply reverse the two-step process – slow-cook first and brown second (Method #3 below). The slow moist-heat cooking tenderizes meat and saturates flavors, while the second step generates color, additional flavor and texture.
| Method | Mechanism | Pros | Cons |
| 1) Slow moist-heat cooking (no browning). | Slow cooking breaks down muscle and collagen for very tender meat. | Liquid retains moisture. Meat is very tender. | None of the color, texture and flavor from browning. |
| 2) Two-step cooking: brown at high temperature first and then slow moist-heat. | Searing at high temperature browns meat surfaces (caramelizing and Maillard reactions). Slow cooking breaks down muscle and collagen for very tender meat. | Initial browning adds flavor and color. Liquid retains moisture. Meat is very tender. | No crispy texture from browning since the liquid in step two softens the meat. |
| 3) Two-step cooking: slow-cook with moist heat and then fry/roast at high temperature. | Slow cooking in the first step breaks down muscle and collagen for very tender meat. Subsequent frying or oven roasting browns meat surfaces (caramelizing and Maillard reactions). | Liquid and low temperatures in step one retain moisture. Meat is very tender. Browning by roasting (where meat bastes in its own fat) or frying adds a unique mix of aromatic flavors and a mix of textures. | More work, but necessary for good carnitas and well worth the trouble! |
Now that we have the cooking method selected (Method #3 above), we just need to finalize ingredients. Nearly any carnitas recipe will include onion, garlic, orange (or lime) and a mix of cumin and coriander. I also like a bit of oregano and allspice. But most, important, is the choice of chilis.
Here is where I relied on a bit of help my Mexican-American friends – notably my friend Gloria, who could write an encyclopedia on what she knows about Mexican food. Her expert opinion said not one, not two, but a mix of three varieties of dried chills work best. Since I always use New Mexico to start, I took her advice and added her choices of pasilla and guajillo to the mix. Gloria was absolutely right. It was a perfect blend! If I didn’t know better, I might have been back in that tired little California storefront…

Carnitas – Ready for Tacos
Carnitas Tacos
——————————————————————————–
Recipe By: A Global Garnish, LLC
2 chilis, dried, New Mexico, split, seeds and stem removed
2 chilis, dried, Pasillo, split, seeds and stem removed
4 chilis, dried, Guajillo, split, seeds and stem removed
4-5 lbs. pork shoulder, with bone (AKA Boston butt, pork butt)
1 quart stock, chicken or pork
1 quart water (more if needed to cover meat)
1 onion, large, chopped
5 cloves garlic, sliced thin
1 orange, naval, quartered, unpeeled
1 teaspoon salt
2 bay leaves
1 teaspoon cumin
1 teaspoon coriander
1 teaspoon oregano
1/2 teaspoon allspice
corn tortillas
tomatoes, chopped
lettuce , chopped
sour cream, to serve on the side
salsa, to serve on the side
1. Cut stems off the dried chilis. Carefully split the edges of the chilis and tear open. Tap to remove and discard the seeds. Toss chilis into a heavy dry fry pan and heat to medium. When you begin to smell the chili aromas, you will know they are heating. Cook until they darken and soften, turning with tongs to avoid scorching.
Remove from fry pan to a heat-proof bowl and cover chilis with boiling water. Soak for at least 45 minutes while you begin the pork preparation.

New Mexico, Pasilla and Guajilla Dried Chilis Toasting in a Hot, Dry Frying Pan
2. Trim excess fat off the pork exterior and cut meat into 2-inch chunks (they do not need to be perfect shapes). Reserve the bone.
Add pork chunks and bone to a stock pot containing 1 quart each stock and water. Add additional water if needed to cover the surface of the pork.
Bring to a boil. Skim and discard any of the foam that forms on the surface.
Add onion, garlic, orange quarters, salt and spices. Return to a boil and then reduce to a simmer.
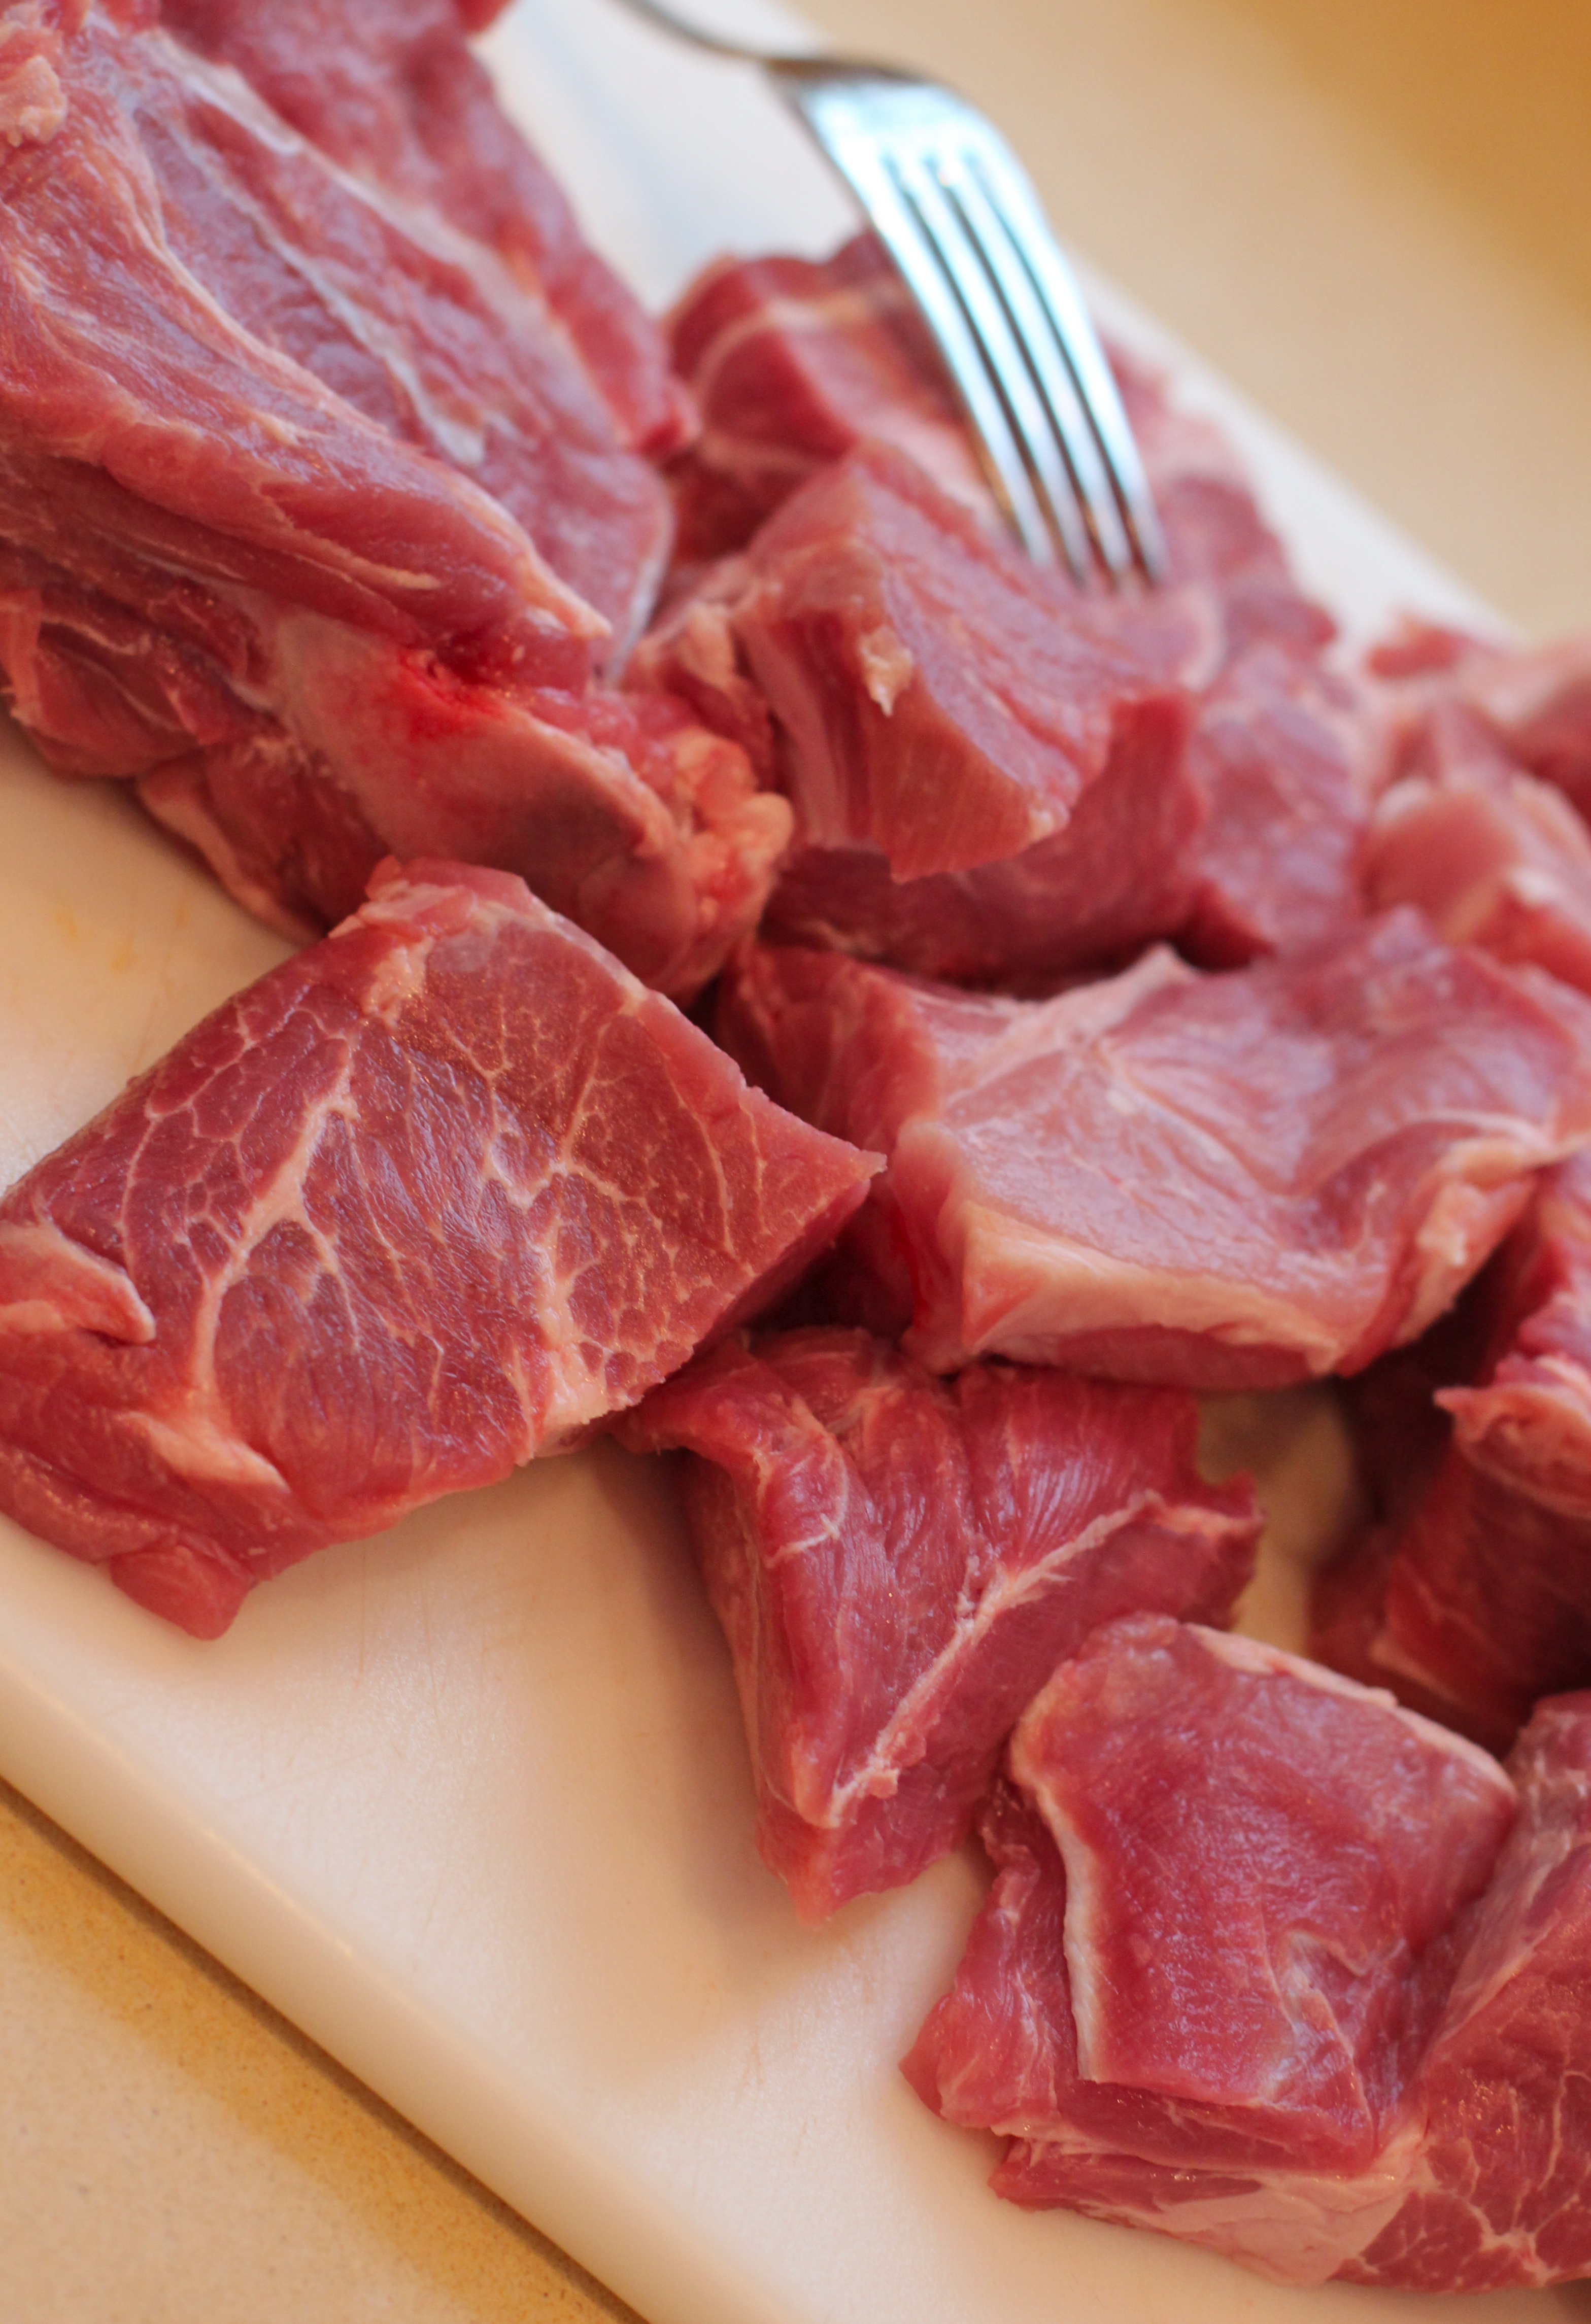
Trimmed and Cubed (2″ Pieces) Pork Shoulder

Pork and Seasonings Slow-Cooking on the Stovetop
3. Remove your chili peppers from the soaking liquid with a slotted spoon (reserve liquid). Add chili’s to a blender with enough soaking liquid to get a smooth puree. Add to pork stockpot.
Taste the remaining chili soaking liquid. If it is not bitter/burnt (meaning you took your chili’s off the stove in plenty of time), add to the stockpot.
Now that your pork mixture is complete, cook at a simmer for about 1 and 1/2 hours while you enjoy the scent of the spices/orange.
4. Preheat oven to 375 deg F.
Remove pork from heat. Transfer to a large baking or roasting pan (such as a deep lasagna pan or shallow roasting pan). I transfer the large chunks of pork first with a slotted spoon and then pour the remaining liquid and ingredients over to avoid splattering. Pork chunks should be about 1/2 to 1/3 exposed above the liquid. If not, remove some liquid and set aside should you need it later.
Roast UNCOVERED for about 1 hour. Check every half hour to see if the pork above the surface of the liquid has started to brown. When it does, turn the meat. Do not let the pan evaporate to dryness. Add reserved liquid or water if sauce in the roasting pan is getting too thick and dry (I did not find this necessary).
After 1 hour, test pork for doneness by removing a chunk and pressing with a fork. The meat should collapse under the fork pressure. If not, return to the oven for another 1/2 hour (or more if necessary).
As an alternative to Step 4 (caramelizing by roasting), you may pan fry the meat in batches on the stovetop. This will produce an equally good result and a crispier texture.

Pork and Simmering Liquid Ready for Oven Roasting
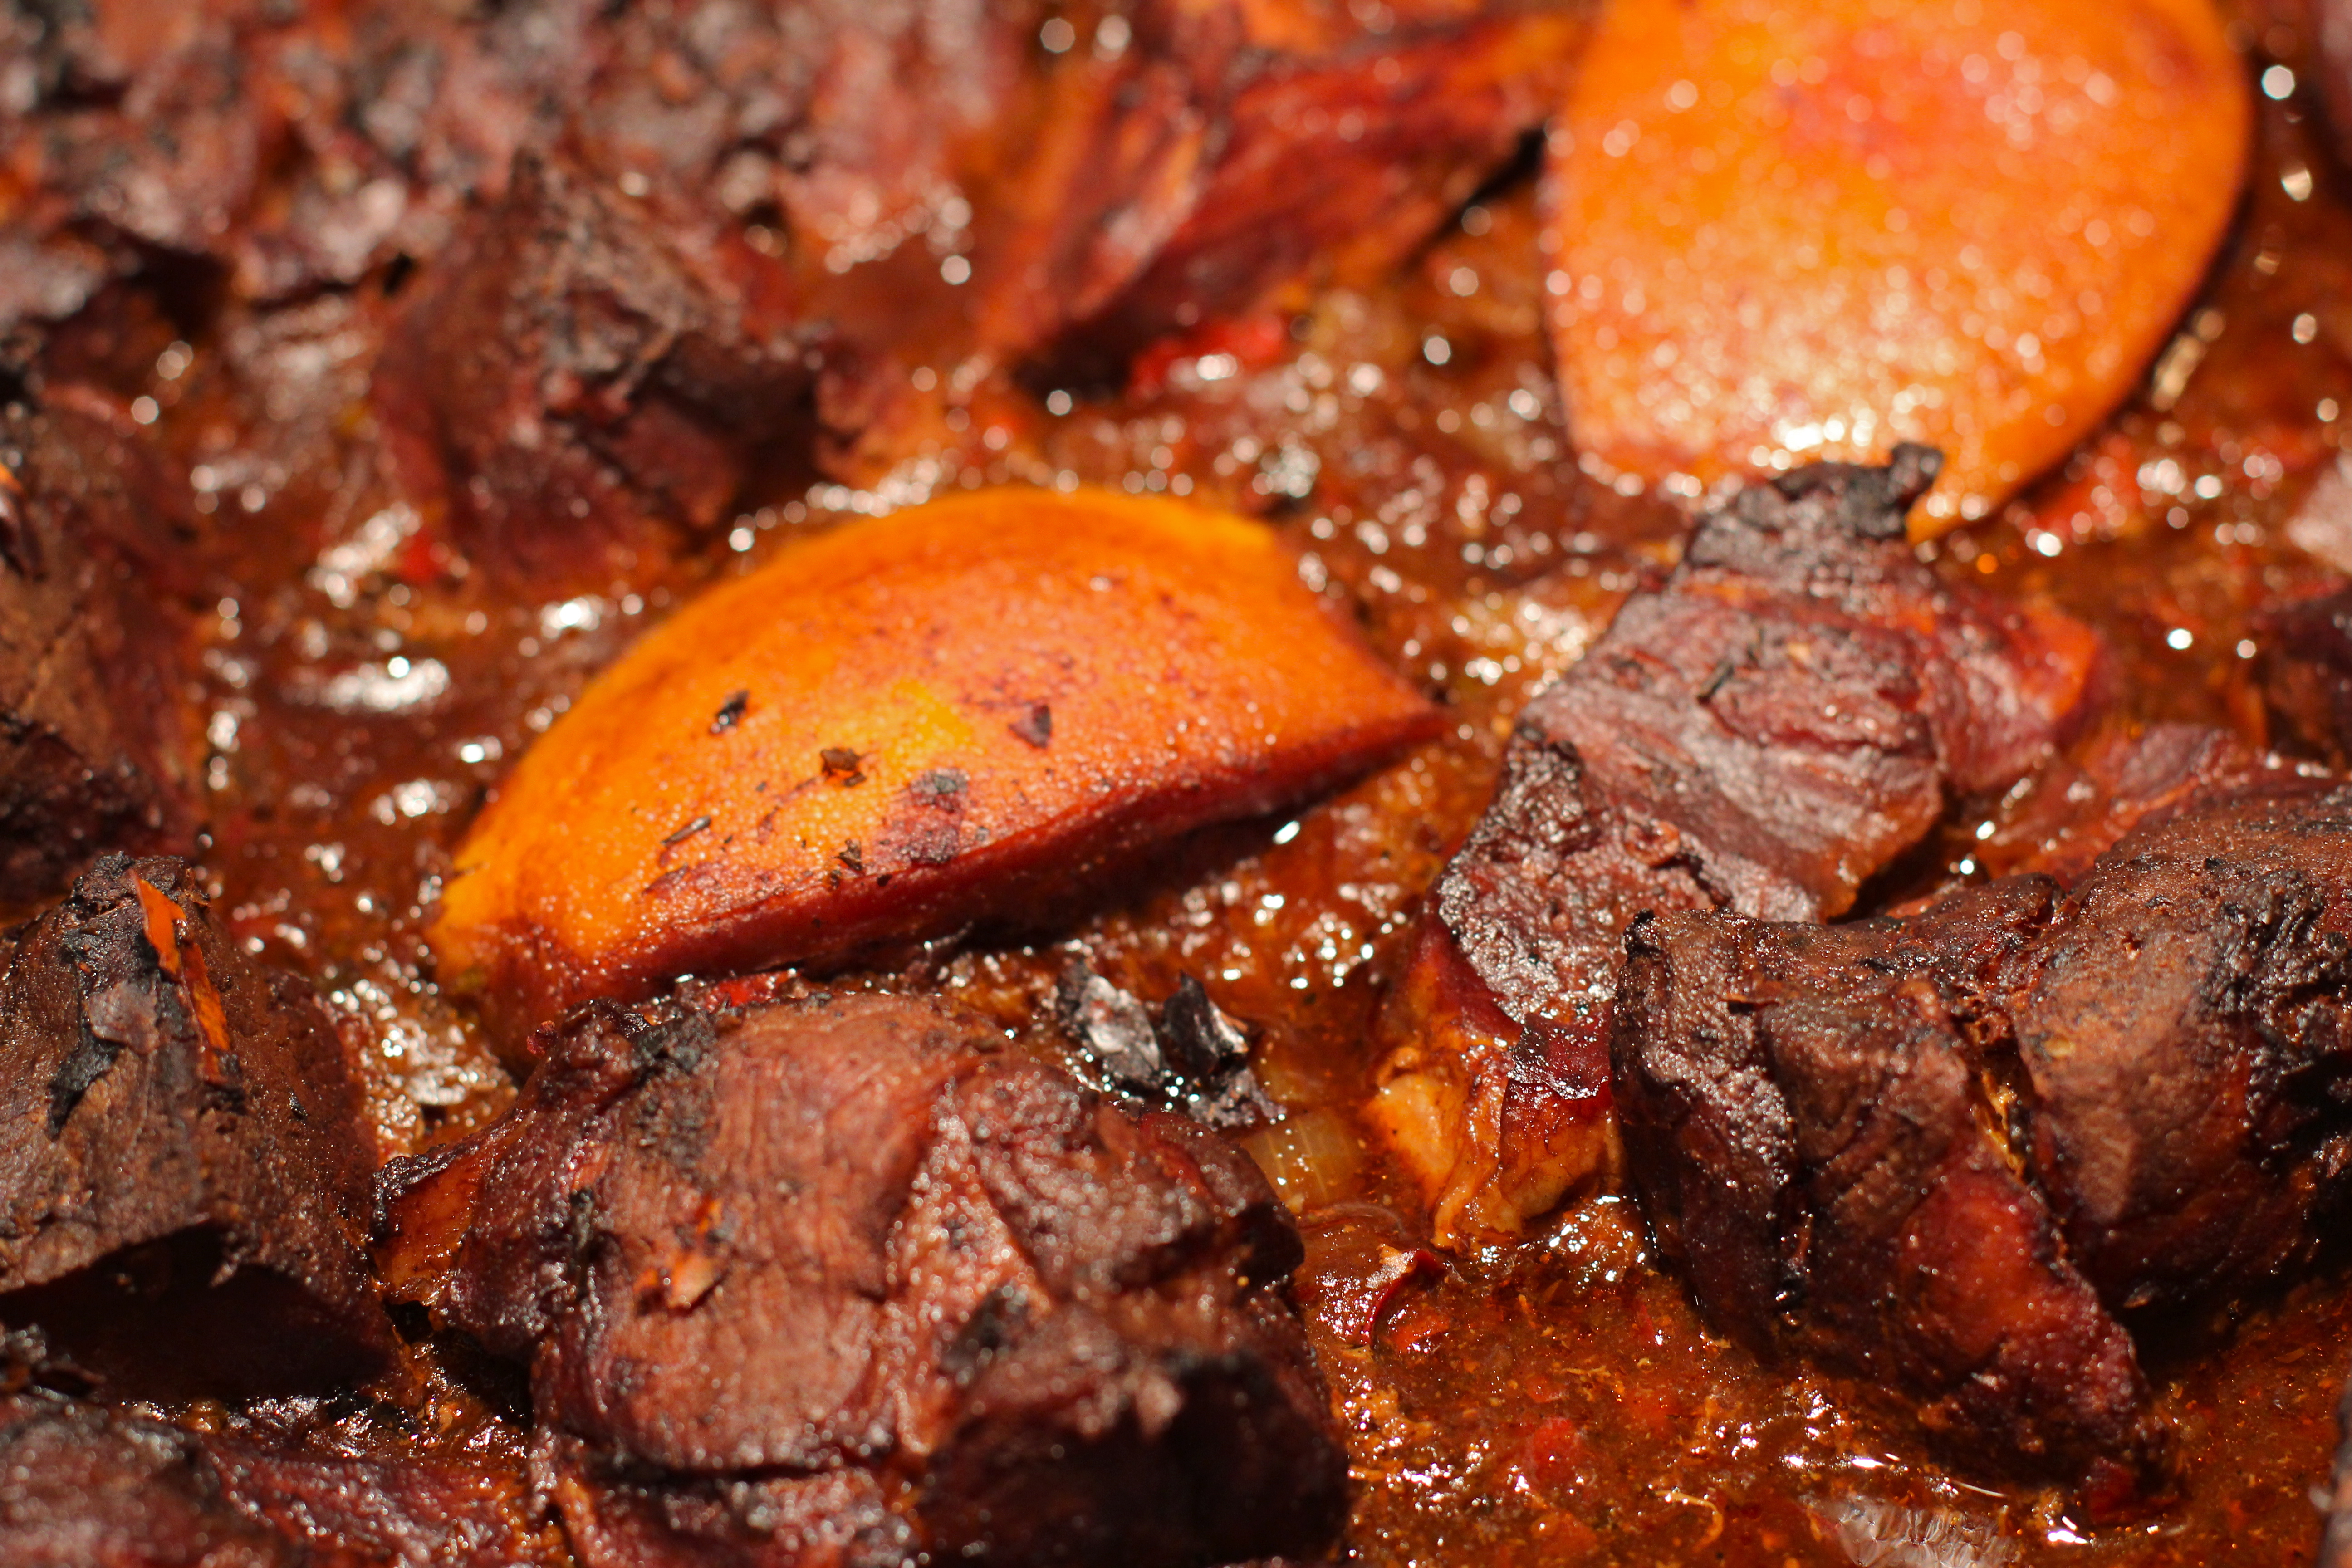
Browned and Crisped Pork after Oven Roasting
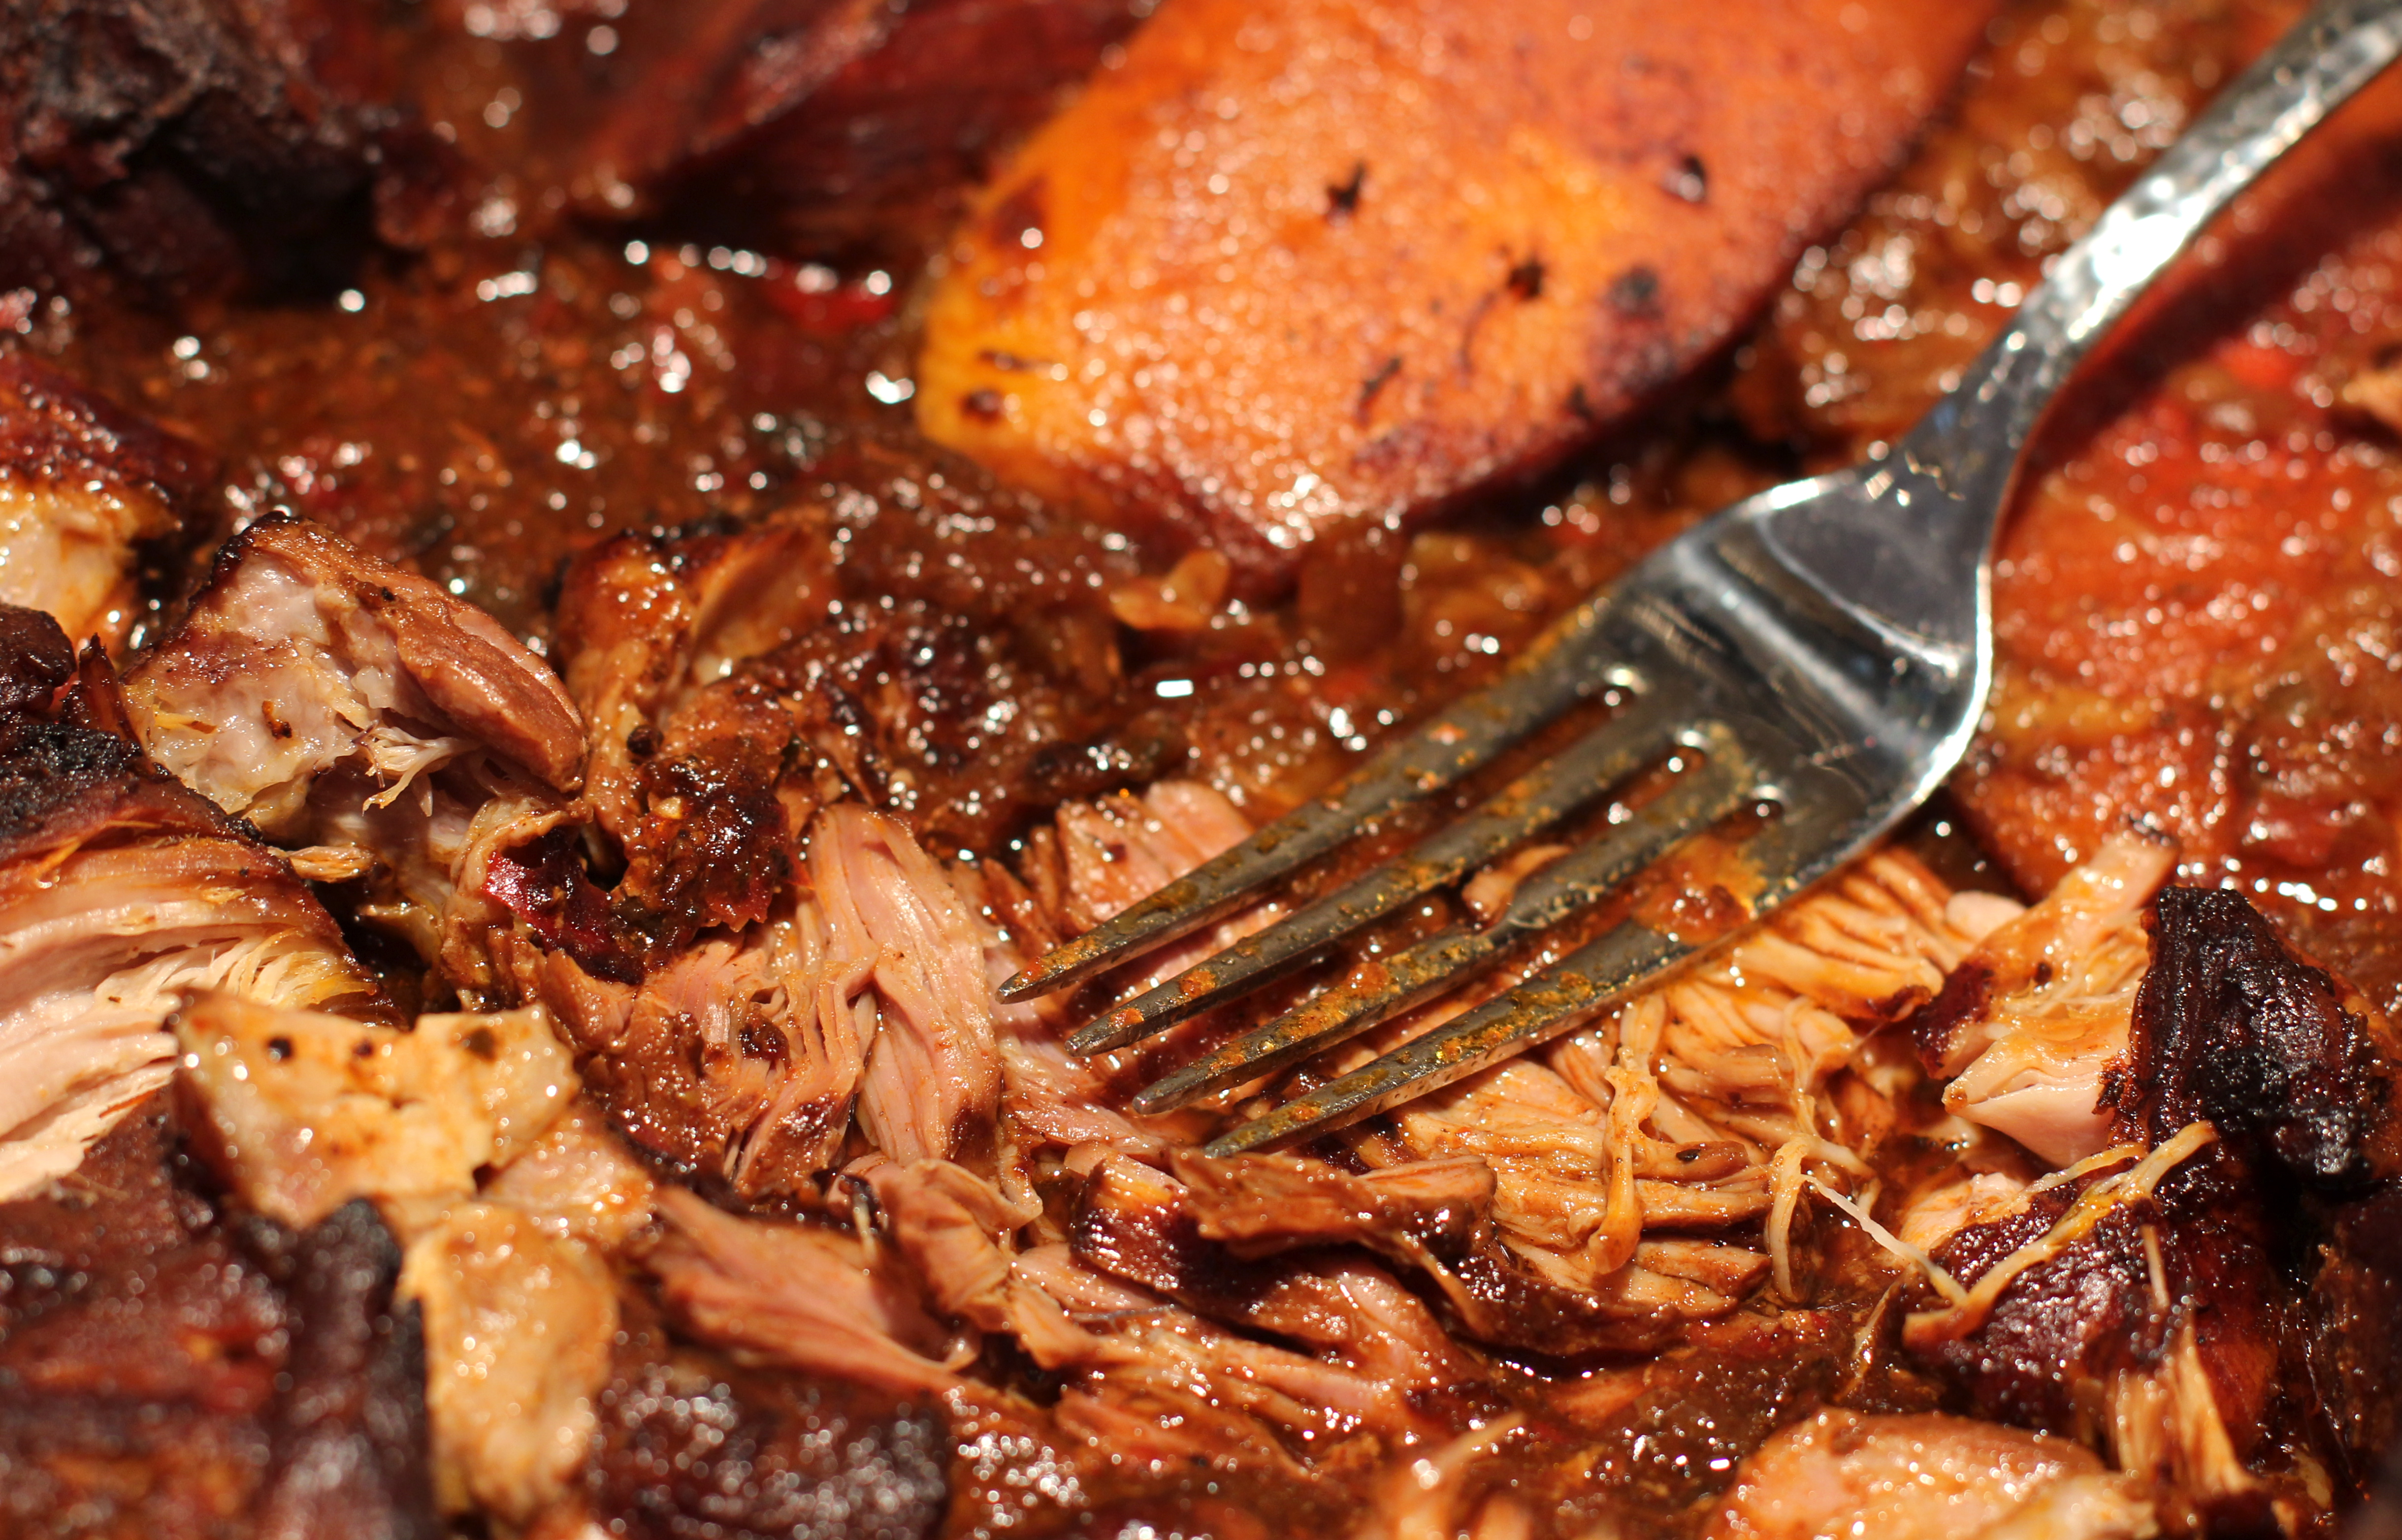
Finished Pork – Tender Enough to Collapse under Gentle Pressure
5. Remove pan from oven and let cool until the pork can be handled safely. Either tear pork with your fingers or mash with a fork. You may find it easier to remove pork to a cutting board for this task and then return to the sauce.
Once pork is shredded, your caritas are ready to serve.
6. Toast corn tortillas on a grill or low gas burner. Using tongs, flip the tortillas as they soften and begin to char slightly. (A microwave will do, but, for full flavor, they are best heated over a low flame.)
Fill tortillas with warm carnitas. Garnish with chopped tomatoes and lettuce. Serve with sides of sour cream and salsa.

Warming Corn Tortillas on a Gas Burner
7. DO-AHEAD INSTRUCTIONS: Carnitas make a great do-ahead meal. Prepare carnitas through step #5. Refrigerate or freeze.
At service time, reheat, covered, in a conventional oven.
For an easy DO-AHEAD main course for a casual party, prepare and refrigerate bowls of toppings (salsa, sour cream, lettuce, pickled red onions, etc.). Before guests arrive, reheat carnitas and set out toppings. Then watch your guests have fun grilling/toasting the tortillas and creating their own carnitas tacos. Round the meal out with rice and beans.

Oaxaca, Mexico – A local resident, probably on the lookout for some carnitas…

J – can I come to Mexico an have carnitas WITH you?
Who needs Mexico? Just stop by – as there’s plenty in the freezer. Oooops. I forgot. We just warmed up to a balmy 14F (-10C). Perhaps Mexico is a better choice 🙂
This sounds amazing. Even though I’ve never been to Mexico (would love to be there right now!) nor have I eaten carnitas. This has to be exceptional. Partly as it sort of reminds me of a turkey leg recipe I do. Just not the boiling of the meat first as that’s not necessary with turkey meat. Anyway, it’s loosely based on a Catalan recipe and worth the nearly four hours it takes to roast. Best turkey ever.
Well, Johnny, I think you need to make it a priority to post that Catalan recipe 🙂
And, yes, Mexico is such a great place – beautiful scenery, great climate, and lovely people. Mexico has its struggles these days, but I do hope it finds its way out of the problems — as usual, it is the good people who are suffering at the hands of the criminals…
Oh wow. This is an EPIC post!! Love the technical instructions (and a bit of ‘food science’ never goes astray!); after reading your post I really feel like I can almost replicate those legendary carnitas you ate all of those years ago. Your photos look absolutely divine… tender, smoky, lots of caramelized goodness. Yum!! Cannot wait to give this recipe a go!
Ha ha. Perhaps a bit too long??? I think I was trying to make up for a couple of months of no blogging:-)
And thank you so much for your comment on the photos. Since you’re one of my photo “heroes”, that made my day!
I bet your carnitas are even better than any Mexican restaurant south of the border. Oh, just looking at that fall apart pork with all of the spices is making my mouth water. Thanks for the explanation on the cooking process as that is important to know and secret for your success in this recipe. Now I have a problem is is 9pm in HK and I am craving carnitas! Take Care, BAM
🙂 If you were here, I’d be so very happy to share!
Looking very good!
Thank you.
Your carnitas tacos sound wonderful and must be full of flavor. You are right, we both were craving tacos. I can’t wait to try your version with the chilies.
Now this is a great way to ‘eat with your eyes’, I could wipe out all that meat in one meal! Thanks for highlighting the slow and last cooking techniques to render a perfect piece of meat every-time. We often use these methods with Indian kebabs and grills…
On a parting note- how come the best food always comes from places with peeling paint? Last week, I had Vietnamese Pho at a small hole-in-the-wall place where I dare not look into the kitchen…LOL
I wonder how carnitas would turn out cooked on a Tandoor clay oven? Could be perfect?! Alas, I will need to wait until I can get a clay oven so that I can try it 😦
And I don’t know about the “peeling paint”. I suppose that can mean that all the money and effort went into the food. The trouble is, it is hard to know which ones are truly good. Usually, a recommendation is required (like I had in my story)…
I’ve had pork kebabs cooked in a tandoor and it’s pure magic on the meat! Definitely worth a try:)
With you on that recommendation part for hole-in-the-wall restaurants…some of those surprises are not good!
Jeannee, I didn’t know that was the secret! We”re in Mexico right now and I don’t think we could ever get enough carnitas! 🙂 Thanks for this lovely recipe that I will try when we get home. ~Terri
Oooh, I’m jealous. Warm weather and carnitas. Lucky you!
And thank you. Yes, like so many things, how you make them does make a difference. I’ve seen recipes where you slow cook carnitas in a crock pot. It may work, but it lacks that fabulous caramelized flavor and crusty texture that comes from frying or roasting.
And do let me know if you discover any carnitas secrets in your travels 🙂
Oh that’s yummy! Thanks for the detailed instruction!
Thanks M&B. And regarding information, perhaps TMI? 🙂
Oh, my word! Carnitas has been my favorite Mexican meal for as long as I can remember (chile colorado being a close second). I cannot WAIT to attempt this dish! Thank you so much for posting it, for the fine story, food science, warmth and humor that made it so grand. Alas, I’ll have to wait until I’m back home in Tennessee to give it a shot…the pork in Oslo isn’t worth having. Greatly looking forward to your next exposition!
Thank you for your thoughtful comment. I’ve always loved carnitas as well – a bit decadent but such a delicious example of Mexican culinary treats. Are you in Oslo Norway? Such a lovely place!